Skip to content

How to Install Ground Mounted Solar Panels Effectively?

Installing ground mounted solar panels can be a rewarding endeavor. This approach allows for flexibility and customization to maximize energy production. Many homeowners consider this option due to its efficiency and potential savings on energy bills.

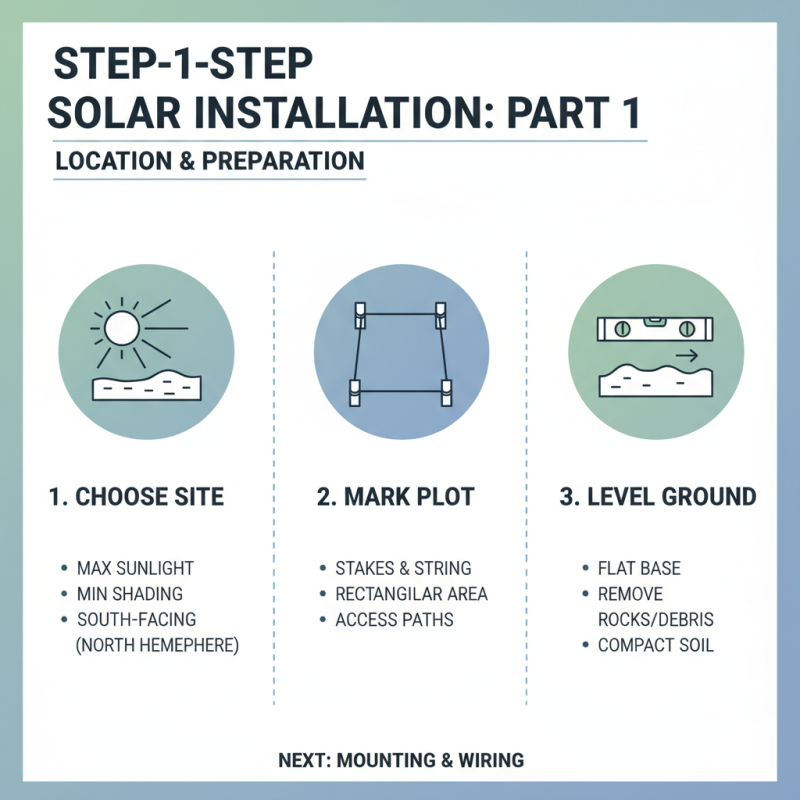
However, effective installation requires careful planning and consideration. Site selection is crucial. The area must receive ample sunlight for the majority of the day. Assessing soil type and drainage is also necessary. These factors can impact the longevity and effectiveness of the system.

Moreover, it's essential to understand the local regulations regarding ground mounted solar panels. This can save time and resources in the long run. Mistakes in the installation process can lead to costly adjustments or suboptimal energy output. Hence, professionals often recommend consulting experts to navigate these complexities. Embracing such advice can enhance the overall value of your solar investment.

How to Install Ground Mounted Solar Panels Effectively?

Understanding the Basics of Ground Mounted Solar Panels

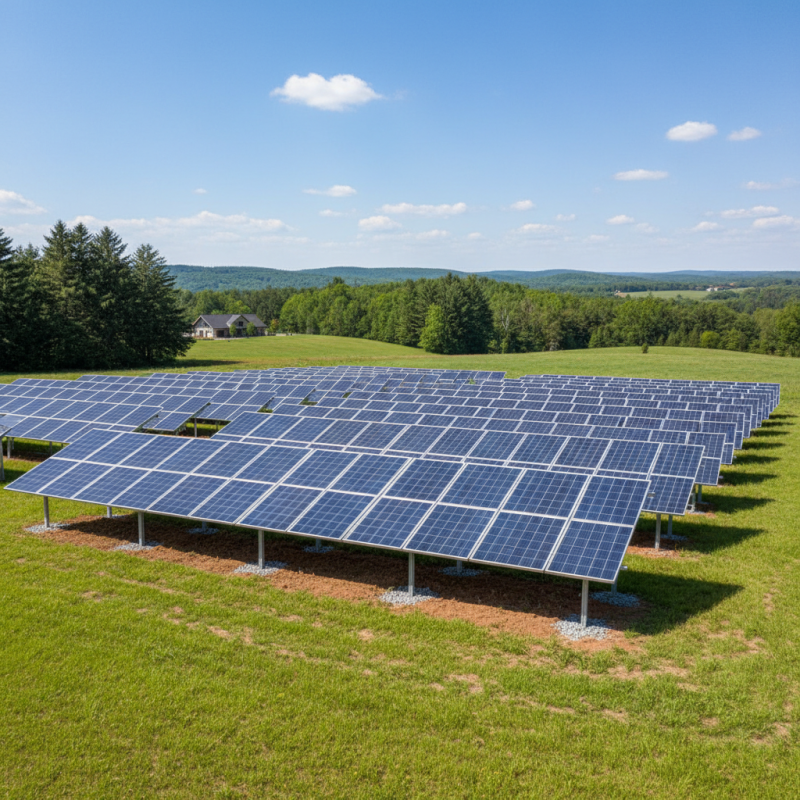
Ground-mounted solar panels offer a viable alternative to rooftop systems. They are often installed in open spaces, promoting optimal sunlight exposure. The size and configuration of your panels are crucial. Assess your land carefully. Make sure you have enough space to accommodate the solar array effectively.

Soil quality can influence installation. Soft soil may require deeper foundations, while rocky terrain could complicate the process. It’s essential to consider drainage as well. Proper drainage prevents water accumulation around the system. Testing soil conditions before determining panel placement is advisable.

Choosing the right angle is another critical factor. Solar panels should ideally be tilted for maximum sunlight capture. Areas with frequent cloudy weather might benefit from steeper angles to optimize energy generation. However, this typically requires more testing and recalibration over time. The installation process may come with unexpected challenges. Pay attention to local regulations, as they can dictate installation methods.

Assessing Your Site for Optimal Solar Panel Installation

When considering the installation of ground-mounted solar panels, site assessment is crucial. One must examine factors like sunlight exposure, soil type, and local climate conditions. According to the National Renewable Energy Laboratory, a well-placed solar panel can produce up to 25% more energy than poorly positioned ones. This means that evaluating your land's potential can significantly affect your system's efficiency.

Tips: Assess the slope of the land. Ideally, panels should be on a southern-facing slope in the Northern Hemisphere. This maximizes sun exposure throughout the day. Verify any shading from nearby trees or buildings. A shaded panel can lose up to 80% of its efficiency.

Soil quality also matters. A study from the U.S. Department of Energy highlights the importance of stable, well-drained soil for mounting structures. Unstable soil can lead to shifting panels, reducing efficiency and increasing maintenance costs over time. Reflect on your landscape. A flat, dry area might seem ideal but can accumulate debris, potentially hindering performance.

Choosing the Right Materials and Equipment for Your Installation

Choosing the right materials and equipment for your ground-mounted solar panel installation is essential for maximizing efficiency. Select high-quality solar panels that boast a minimum efficiency of 15% to ensure optimal energy conversion. According to industry data, panels with efficiency ratings above 20% can generate up to 30% more electricity over their lifetime.

In addition to panels, consider the mounting system. Ground mounts should be durable and weather-resistant, typically made from aluminum or galvanized steel. Both materials offer longevity and corrosion resistance. Ensure that the mounting system complies with local regulations to avoid future complications.

Tip: Always consult with a local solar expert before purchasing equipment. Their insights can prevent costly mistakes. Pay attention to the warranty offered on panels and equipment—this often reflects their reliability.

Also, be mindful of local soil conditions and weather patterns. Instability in soil can lead to shifting mounts, causing performance issues. Conduct a thorough site assessment before installation to identify potential issues early on, and plan accordingly.

How to Install Ground Mounted Solar Panels Effectively?

Material/Equipment Description Expected Lifespan Average Cost
Solar Panels Photovoltaic cells that convert sunlight into electricity. 25-30 years $150-$300 per panel
Mounting Racks Structures used to hold solar panels at an optimal angle. 10-20 years $50-$150 per rack
Inverter Converts DC electricity generated by solar panels into AC electricity. 5-15 years $1,000-$3,000
Wiring Conductors that connect all system components together. 15-25 years $100-$500
Batteries Store excess energy generated by solar panels for later use. 5-15 years $200-$800 each

Step-by-Step Installation Process for Ground Mounted Solar Panels

How to Install Ground Mounted Solar Panels Effectively?

Installing ground-mounted solar panels can seem daunting, but clear steps can make it manageable. Begin by selecting an ideal location. Choose an area with maximum sunlight exposure and minimal shading. This affects overall efficiency. Mark your plot using stakes and string. Ensure the ground is level; uneven terrain can complicate installation.

Next, prepare the site. Clear any debris and vegetation. This ensures a stable base for the solar panels. Dig holes for the support posts. The depth depends on local frost lines and soil conditions. Use concrete for added stability. Position the panels at an angle, optimizing energy capture. Ensure each panel aligns correctly to maximize sunlight incidence.

Wiring is crucial. Connect the panels to the inverter and battery storage system if necessary. Test each connection as you progress. This minimizes the risk of faults later. Regular checks are important post-installation. A small oversight can lead to performance issues. Maintain a watch on the panels for any damage or dirt buildup. Just remember, installation has learning moments. Reflecting on mistakes will help improve future projects.

Maintenance and Best Practices for Ground Mounted Solar Systems

How to Install Ground Mounted Solar Panels Effectively?

Ground-mounted solar systems require regular maintenance to perform at their best. Keeping panels clean is crucial. Dust and debris can reduce energy production by up to 25%. A simple wash every six months can maintain efficiency. However, it's vital not to use harsh chemicals. Soft brushes or cloths prevent scratches on the panels.

Monitoring the system's performance is equally important. Install monitoring technology to track energy output. This way, you can quickly address any drops in performance. According to reports from the Solar Energy Industries Association, systems with effective monitoring can improve efficiency by 15%. In addition, inspecting wiring and inverters regularly helps avoid costly repairs.

Lastly, vegetation management around the installation site is essential. Overgrown plants can shade panels, leading to reduced output. A buffer zone of at least 3 feet is recommended. This practice not only protects your investment but also promotes safety by reducing fire hazards. Regular checks, combined with these maintenance strategies, can ensure that your solar installation remains productive for years.